Friday, September 30, 2011

Course - Complete!

Sometimes I even amaze myself.
After finishing Class 4 of Wilton's Decorating Basics at Michael's, I'm finding myself emerging as an artist. I have better-than-average crafting skills (in college and in Chicago I worked as a prop designer on several theatre productions) but nothing was truly amazing. But this? Cake decorating? I found my strong suit!

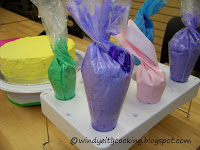
For our final lesson, we had to bring in an iced and ready to decorate cake. I used The Cake Mix Doctor Bakes Gluten Free's recipe for Devils Food Cake with Bob's Red Mill Chocolate Cake mix. I made the cake ahead of time and leveled and froze it. The day before class, I defrosted it in the fridge and then made my icing and frosted it while watching TV. So it took a little longer to frost than it should have (Glee was very distracting this week). I realized that the more I messed with it, the worse the cake looked. It was better to walk away and leave it be at a point. I also mixed two pounds of powdered sugar worth of icing in various colors for my cake, choosing vibrant and bold colors.
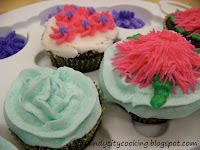
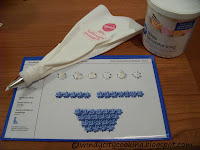
In class, we learned how to print. Writing is not my strong suit - I'm left handed in a family of right handers and I grip my pen really weird. So holding the bag properly was weird for me. It didn't look that bad - but it left me with something to keep practicing. The only other thing we learned was how to make a ribbon roses . My icing was a little too thick, so the petals did not have a super clean edge. But as my instructor pointed out - they look very natural. I made a lot of progress even between my first and fourth rose.

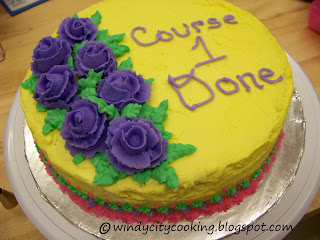
For decorating the cake, we could do whatever we wanted to showcase the different techniques we learned throughout the course. The general cake decorating guidelines are to do your writing, flowers, leaves, and borders in that order. I found that using the Wilton Flower Lifter (rather than a spatula or my fingers) to move the flowers was a lifesaver. I was able to get my flowers perfectly positioned every time. As my cake came together with each addition and splash of color, my adrenaline started pumping. I was very excited to create something so beautiful and so uniquely me.

Taking the class with food allergies was actually not a big deal at all! I went into the class terrified that someone was going to accidentally glutenize my food (I pictured cake flying everywhere - not the case at all) and was so relieved to have an incident-free experience. The icing (assuming you don't use milk and go with water or a milk alternative) is dairy free. Wilton has been fantastic with answering my questions regarding products' milk and gluten statuses (their products tend to be "same facility as" wheat and milk). My frosting behaved just like everyone else's did and I was never at a disadvantage in class. When my friends on Facebook asked if I made it "edible (by us) or poison?" I was excited to answer that it was entirely gfdf. I maintain a strict dedicated gluten free kitchen (I live alone - it's easy) and could not imagine the emotional stress of working with wheat.

I'm planning on taking the next two courses when the weather gets warmer. Juggling a cake, bag and purse or backpack on public transit during rush hour was a little much. I can't imagine doing it with a bulky jacket in the snow. (But now that I've said that, watch, I'll sign up for a January or February course during a blizzard.)

Overall - I highly recommend the Wilton classes. They are an easy and affordable (if you time your coupons right) way to learn lifelong skills that help you elevate your baked goods to the next level. You learn so many tricks and techniques along the way that open up the door to so many new decorations on the Wilton website. You'll impress your friends and coworkers and surprise yourself and have fun all at the same time! And you'll never look at an overpriced, poorly decorated cake at the store the same way again!

Sunday, September 25, 2011

Decorating Basics - Week 3

Week two was a cupcake cake (how meta) and week three moved the cupcake to the starring role.

For Lesson Three of Wilton Cake Decorating Basics (I'm taking the class at Michaels), we learned how to make icing flowers and a few new techniques. The drop flower is super easy - we learned both methods - the star flower (simple squeeze and lift) and the swirled flower (squeeze, turn and lift). The rosette was nice and elegant.
The shell gave me a bit of trouble - I'm having difficulty being consistent and this is one technique that I really need to master since the shell is one of the most common borders on cakes. We took out our flower nails and learned the pompom flower (which my instructor loving calls the sea urchin). My very first attempt is pictured - I swear I got better as I made a few more. Net up was leaves - the tip does the work for you! Beautiful leaves every time! We also learned shaggy mums that were very fun to make. We had the opportunity to fill our cupcakes and tossed around some ideas of good fillings. Perhaps the greatest thing we learned was how to ice a cupcake. My instructor said that the trick is to go faster and with more pressure than you think you need. In about five to ten seconds, I had a perfectly iced cupcake. I think that is faster than taking a spatula out of the drawer... This is now my go-to-method for icing cupcakes. Where has this trick been my entire life? The tip is only $1.69. That's nothing considering the praise you will get for your beautifully iced cupcakes!!

After we learned all of our new techniques, we had time in class to practice what we learned. My gluten free cupcakes started off looking very pitiful (I used a doughnut recipe to make mine, so they were all sunken in) and ended up as a colorful array of cupcakes! Once I got home, I took out some plates (these make cleanup a BREEZE!) and started practicing some of the techniques I learned and used up my extra icing. My white plates were quickly dotted with pink flowers, purple shells, green leaves, and white stars.

When I started this class (meets for four weeks, two hours a time, on the same night throughout the month), the class was crowded with 11 students. By the time we got to week 3, we were down to 5 students. Where did everyone else go? All the ladies in my class were super excited to take it, but our numbers keep dwindling. I'm all for learning on the internet and from TV, but there's something important missing when you don't have an instructor who can help guide you along or fellow classmates whose work can inspire you. (I totally keep looking over to see what everyone else is doing - we can all be doing the exact same technique but we each have our own personality woven into it. Very cool!)

Next up? Learning roses and my final project cake. (Color scheme and theme still to be determined...Really only two days to decide since I need to make my frosting on Tuesday night...No pressure.)

Sunday, September 18, 2011

It's a Cupcake Cake!

For our second class, we were to bring in one 8" cake and then level and fill the cake in class. Gluten free cakes do not rise well, so I made two 8" layers from one recipe (I used the yellow cake potato starch recipe from You Won't Believe It's Gluten Free. Strangely enough, this is my first gf yellow cake.) I made chocolate pudding with soy milk for my filling. As predicted, I WAS the girl on the train balancing a cake, a messenger bag, and an overflowing bag of cake make supplies. Taking this class is probably the first time I ever wanted a car in the city. I got nervous watching my cake slide around in its carrier on the over-crowded bus and eL.

During the class, we learned about curving lines and tight zigzags (which require holding the bag at an awkward 45 degree angle) and dimensional decorating. We also started coloring our icing - I bought the 12 color set (thank you, 50% off coupon!) so I have a variety of bold colors to use. After a few minutes of practicing the new techniques, we got to work on our cakes. Everyone in class worked at her own pace and soon our bare cakes were transformed into colorful creations as we iced the cake. While the icing was setting (put your cake in the fridge for 15 minutes if you can!), we mixed colors for our top design. The patterns for the designs are traced with piping gel on parchment paper and then placed on the cake and ever so gently transferred. The instructions in our class guide recommend using a paint brush; our instructor used her finger and said that the paint brush method was good for people who would otherwise have a very heavy touch. Well guess what - I'm a paint brush person.

My first attempt at transferring failed so I had to retouch my cake, wait 15 minutes for the icing to set, and then try again. When my cake was finally ready to go, I got to work with my various icing bags. Decorating the cake with dimensional decorating was much easier than I thought. I was basically making zig zags and circles and out came a gorgeous cupcake! The base of the cake was decorated with white circles.

I had one of those "Oh my God - I made that? (And it doesn't suck?!?)" moments.
Remember how I said I wish I had a car in the city? If I thought I was nervous with a naked cake moving around in its carrier while on public transit, I was panicking with an iced cake. I made it the few blocks to the train station and as I was sitting down on the eL, the cake shifted and one side got smashed. I brought most of my icing home with me, so I was able to perform some cosmetic surgery and return my cake to its original glory. I adhered the cake board to the base of the cake carrier with some duct tape and successfully and problem free carried it on the bus to work the next day. My coworkers loved the cake and I was happy to share something that looked beautiful and tasted great, too!

Next up: cupcakes and flowers. Don't worry - my cake carrier has cupcake holders so my creations won't slid.

Thursday, September 8, 2011

Wilton Decorating Basics - Class 1

While my cupcakes with powdered sugar dusted on top are pretty, at some point in my gluten and dairy free life I need to put a little more work into the finished product. And learn how to decorate a cake without resorting to the decorate-while-warm-for-the-melted-frosting look. I've known about Wilton cake decorating classes forever - there is a Michaels store in my hometown and I've always wanted to go but never really felt like it was the right time for me or it did not fit in my schedule. This past birthday, my aunt went to the Wilton tent sale and bought me some new brownie and loaf pans (with rounded edges so no crumbs stick) to upgrade my gear and surprised me with a 25 piece decorating set with some piping gel. She obviously thought more highly of my decorating skills than I did... When I was a prop designer, I decorated three cakes in a year - all of them looked horrible. But that's going to change! I signed up for the Wilton Cake Decorating Basics course at my local Michaels craft store and now I'm going to be a decorating extraordinaire!!!

For the first class, our supply list included the kit, ready made icing and cookies. After a few e-mails back and forth with Wilton, I learned:

White Decorator Icing, 710-118: no dairy or gluten in this product but there was dairy and gluten in the plant. This means our lines are cleaned for cross contamination but we let customers know this for air born allergies.
Most of our icing colors are gluten and dairy free but the only way to be sure is to check each stock number such as 610-256 in order to know for sure. I hope this helps and I apologize for any inconvenience. If you have any other questions or stock numbers you would like us to check, please feel free to let us know! We appreciate your business,

So far, so good! I'm still not a fan of needing to e-mail the company with stock numbers of already purchased products (that seems to be the only way to get a solid answer), but am happy to know that Wilton is on top of the cross contamination issue and declares allergens on their labels. (The white decorator icing is made in a facility that also processes milk and wheat products.) They were also quick with their responses.

I'm always going to be the special kid in class because I'm left handed. But I can't eat wheat or dairy? And I need to make buttercream icing? Fun fact: Wilton's class buttercream icing is butter and cream free. It uses shortening (Crisco), milk or water, confectioner's sugar and the optional flavor, meringue powder and salt. Helpful hint: Crisco doesn't change consistency with temperature. Butter does. Keep it dairy free. No problem!

For the first class, we were supposed to bring in cookies. Since I'm super excited about baking these days, I made up a recipe to make six very large, chocolate cookies. Recipe at the bottom. I was ambitiously over-prepared for the first class (I found the supply list online) so was able to buy some things with 40% off coupons first (you get a 10% off class supplies coupon, but 10% off is kind of a joke when you are looking at all the toys you need/want. At the first class, we started late because people needed to still buy their kits and icing (do this in advance!). Our instructor went over how to bake a cake (no new info for me), recommended using box mix (too expensive for me), how to make the icing and how to water it down for the right consistency, how to fill a decorating bag, leveling and torting a layered cake, how to ice a cake and how to make a piping gel transfer. Seems like a lot of info, but a lot of the class was very basic.
When we did get our hands into the action, we pretty much just piped stars using tip 18 on the practice board and then class was over. I wasn't leaving until I decorated at least one cookie, so I piped some stars in a swirl on one and took a picture. I decorated the rest when I got home. The next night, I took out the practice board and kept going with the stars. They are getting closer to consistent the more I practice.

Next week we need to bring in an 8" cake to level and tort. Gluten free cakes don't rise too much, so this means I'll be making two 8" layers and leveling off the tops. I still need to decide on the filling... And find a recipe! And buy more things! Yeah...I'm going to be that awkward girl on the train next Wednesday during rush hour juggling a cake, plastic tool box and backpack, aren't I?


Michelle's First Ever Cookie Recipe
1 stick vegetable oil spread/dairy free butter
1 c gluten free flour mix
1/3 c unsweetened cocoa powder
1/2 c sugar
1/4 t salt
1/2 t baking soda
2 t vanilla
1 egg

Preheat oven to 375 degrees. In a stand mixer, cream the butter. In a separate bowl, whisk together all the dry ingredients. Slowly add to the butter mix. Then add in the vanilla and egg. Mix well. Place cookies on parchment paper on a cookie sheet. Bake in oven for 8 minutes. The cookies should expand quite nicely and give you PLENTY of room to add as many stars as you desire.